So you want to start your own travel blog? Not a bad decision! I’ve been travel blogging for years now and it’s been very rewarding to write about one of my biggest passions. Whether you’re doing it to try and make a little money from blogging to supplement your travels, or simply writing to keep a diary, this guide will tell you everything you need to know to get started.

From setting up WordPress, to applying for hosting, there are many things to know to get started. These steps are all coming straight from my experiences and opinions. I’ve spent a lot of years making mistakes and learning from mistakes so hopefully you can avoid some of them. Blogging is a lot of work if you want to make something out of it. However, it’s very rewarding work (if you can even call it work!)
Choose a Niche in Traveling
The first step to starting a travel blog is deciding on your niche.
Your niche is simply the topic that you blog about. For example, there are blogs out there in niches like fashion, cooking, parenting, personal finance, and so on.
I know what you’re probably thinking: isn’t my niche just travel?
Yes, travel in itself is a niche and it’s okay to have a general travel blog. In fact, Wander Her Way is pretty “general” in that I write about many destinations and topics within the travel sphere.
However, if you can “niche down” further, there are many benefits to doing so.
Here are some travel niche ideas:
- Sustainable travel
- Luxury travel
- Budget travel
- Country-specific travel
- City-specific travel
- Solo travel
- Couples travel
- Family travel
- Working abroad
- Travel for retirees
- Adventure travel
- Living in a van or RV
- Cruise travel
Choose a good blog name
The next step is to choose a good name. This is the easiest and hardest part of the game. It’s easy because you just choose a name. It’s hard because the name you choose cannot easily be changed in the future. You will want something you are passionate about and dedicated to.
Here are some recommendations I have for choosing a name.
Keep it short and catchy
Keep it short and catchy: You will want a name that is not too long but also something that is catchy and easy to remember. For example, if I used a blog name of Johnny’s Adventure Travel Blog, this is too long and would look ugly on a domain name.
Don’t pigeonhole yourself
When you choose a name, make sure to think to the future. If you want to scale up your travel blog so many readers read it, it’s best to come up with a name that is broad, ambiguous, and suitable for all situations.
For example, if your name is Jenny and you visit Greece (which I love) and the inspiration for a travel blog comes at this instance, then perhaps you might go with a “Jenny in Greece” name for the blog and a jennyingreece.com URL.
If you plan to focus your blog entirely on Greece, then this would be the best option for sure. However, if you get the travel bug and then travel to other parts of the world, then Jenny In Greece might seem strange if you are all of a sudden focusing on traveling in South Africa.
Similarly, pick something you can grow with. If your blog name is 20somethingtraveler.com, what happens once you turn 30? That will happen without fail and all of a sudden you are 30somethingtraveler but your domain no longer reflects that.
I started my blog when I was living in South Africa, hence the name Johnny Africa. Looking back on it, I should have probably named it something more broad like Nomadic Johnny or Eternal Expat or something along those lines. Nevertheless, I am happy with my blog name as the whole premise behind it started when I moved to South Africa.
Choose A Domain Name
Once you have your name set, it’s time to get the domain name. For all domains, I would recommend using a .com domain. Avoid .net and .org domains as they are harder to remember. Let’s be honest, everyone defaults to using .com in this day and age.
If your blog name is not available as a .com domain, I would recommend choosing something else to be your name. Do not use hyphens as that just makes it more confusing.
Don’t be afraid to use your own name in your blog. I think it gives your blog a strong identity and many times it can be catchy.
Use WordPress.org, not WordPress.com
Almost every successful blog out there uses WordPress nowadays. WordPress is a website making and blogging tool that has everything you need to start a blot.
There are two version of WordPress: WordPress.com and WordPress.org. These names are a bit confusing so I will try to simplify it.
WordPress.com is simply hosting your WordPress blog through their website. This means WordPress takes care of all your hosting and your blogging. The interface is also much more friendly and easy to use.
WordPress.org
WordPress.org is the open source software and code that you host on your own website. This is more complicated to set up and I will be the first to admit that WordPress is not very user friendly for beginners. There is a learning curve for sure, but once you get comfortable with it, it is straight forward.
So you’re wondering why would I ever host it on my own then? Simple. Customization.
With WordPress.org, you can download and install plugins that you can’t do with WordPress.com. Some of these plugins are extremely important like ones that monetize your blog.
If you don’t have any plans to monetize your blog or try to really grow its audience.
To summarize it, check out this nice infographic.
Choose the right hosting service
So you’ve finally chosen your new Blog’s name and you’ve registered the domain accordingly. The next step is to choose your hosting provider. This is the company that will store all your photos, videos, posts, etc. There are countless providers out there that all offer similar style services at similar prices. Hosting can be cheap. I’ve seen services for as cheap as $3/month for the first year (then it usually skyrockets to $10 a month or so). However, you do not want to go bargain hunting for hosting. You want a host that is powerful and reliable.
It’s almost impossible to know what to choose if this is your first time. I’ve gone through the battleground of website hosting for many years so these are my recommendations from personal experience.
Choose a host that is fast
Most importantly, you want a hosting service that is fast. Your site speed is important when it comes to ranking in Google and the experience it will give to your readers. There’s already a million things that can slow down your website after you start tweaking your WordPress site but these are in your control. What is not in your control is the speed of your host.
Things like time to first ping and latency are directly related to how good your hosting provider is.

Good customer service
Customer service is paramount for me. When something goes wrong with your website, you want a host with on demand customer support reps that are smart and ready to help you out.
Server Uptime
Another thing to watch out for is how reliable the service is. Many hosts tout that they have 99.9% uptime but is this really the case? You’re paying for a service after all so you want it to be reliable.
Pricing and the package offerings
Lastly, if this is your first travel blog, you will probably want to spend as little money as possible due to limited finances. If you are not limited financially, congrats, go for the best of the best!
Hosting is not expensive but I wouldn’t consider it cheap either. Nevertheless, it is something you have to spend in order to put yourself in the best position to succeed.
If you’re just starting out, I would recommend you choose a lower tier package just because you probably won’t need as much storage space or bandwidth. If you make it big and start getting loads of traffic, you can always upgrade at the time because the host will not say no to more money!
Keep in mind that almost all hosts offer intro teaser rates. For example Bluehost offers
Do not use Bluehost.com
I’ve read through numerous other travel blogs that have similar “how to start a travel blog” type of posts and almost all of them recommend using Bluehost as a hosting service. I was one of those new travel bloggers suckered into this. Let me just say this concisely: Bluehost is terrible.
I was with Bluehost for five years and they were an absolute terrible business. Their hosting was cheap yes, but it was incredibly unreliable. I experienced website downtime regularly due to system malfunctions, brute force hacking, and numerous other issues. When I contacted customer service, it was always a call center person in the Philippines that didn’t really understand what was happening and would just tell me an expert was looking into it.
I can’t recount how many chats I had with Bluehost that it made my head spin. I would spend hours calling and chatting with incompetent support representatives and much of the time I was just sitting there not knowing if this was the end. Somehow, this always seemed to happen when I was just about to go on a hotstreak, aka seeing an increase in traffic and engagement.
So if there is one thing you get out of this post is DO NOT start your blog with Bluehost. Here is a post that goes into detail about why Bluehost is terrible.
All the travel blogs recommending you to use Bluehost are purely doing it to earn affiliate money, aka they get a cut for every person they refer from their website. In fact, I would wager cold hard cash that none of these travel blogs recommending Bluehost use it as their host.
Go with Siteground
After many frustrating years with Bluehost, it was time for me to upgrade to a more superior host. After reading countless posts about “high end hosts”, I found the Siteground was the most recommended as being reliable, great customer service, and relatively cheap compared to their competitors.
I’ve since been on Siteground for almost two years and I must say that the experience has been great.
I have not had one instance where my site was hacked or the server was down for inexplicable reasons. The times that I have had to contact support because my site wasn’t working was because I exceeded my disk space. They promptly helped me fix it.
Update 2024: I’ve since stopped hosting my blog with Siteground. They have great introductory prices but when it comes to renewing the service, they pull a bait and switch on you with prices going up 3x. For 2024, the price to renew was about $40 a month on a long term plan. This is far too much for shared hosting. Aside from the pricing, the customer service and quality of the hosting was great.
Host your blog with Cloudways
In 2024, I’ve switched my hosting provider to Cloudways. I was eyeing Cloudways for a long time now as they offer dedicated VPS hosting at a very reasonable price. Dedicated hosting is different than the shared hosting provider I had with Siteground. With shared hosting, your website lives alongside others, which are neighboring users utilizing the same server. With dedicated hosting plans, your website has a server all to itself.
This means the service is generally much faster than shared hosting which I already can notice. Best of all, Cloudways has cheaper prices than Siteground. For my blog which has about 80k-130k pageviews a month, I only need the 2nd tier package from the offerings Cloudways gives you.

I’ve been on the 2gb ram and 50gb storage plan for a few months now and have plenty of buffer room. I suspect I would not need the next package up until I hit something like 250k pageviews a month. The price is very transparent and it doesn’t change like Siteground does. The customer service has also been great so far and aside from a few set up issues early on, I haven’t had to talk to them since.
Setting up your travel blog with Siteground
If you are interested in Siteground, then know that it is not as cheap as the others. If there’s one thing I learned from years of blogging, is you don’t want to bargain hunt for a good host. It’s just not worth it in the long run.
To get hosting through Siteground, click here.
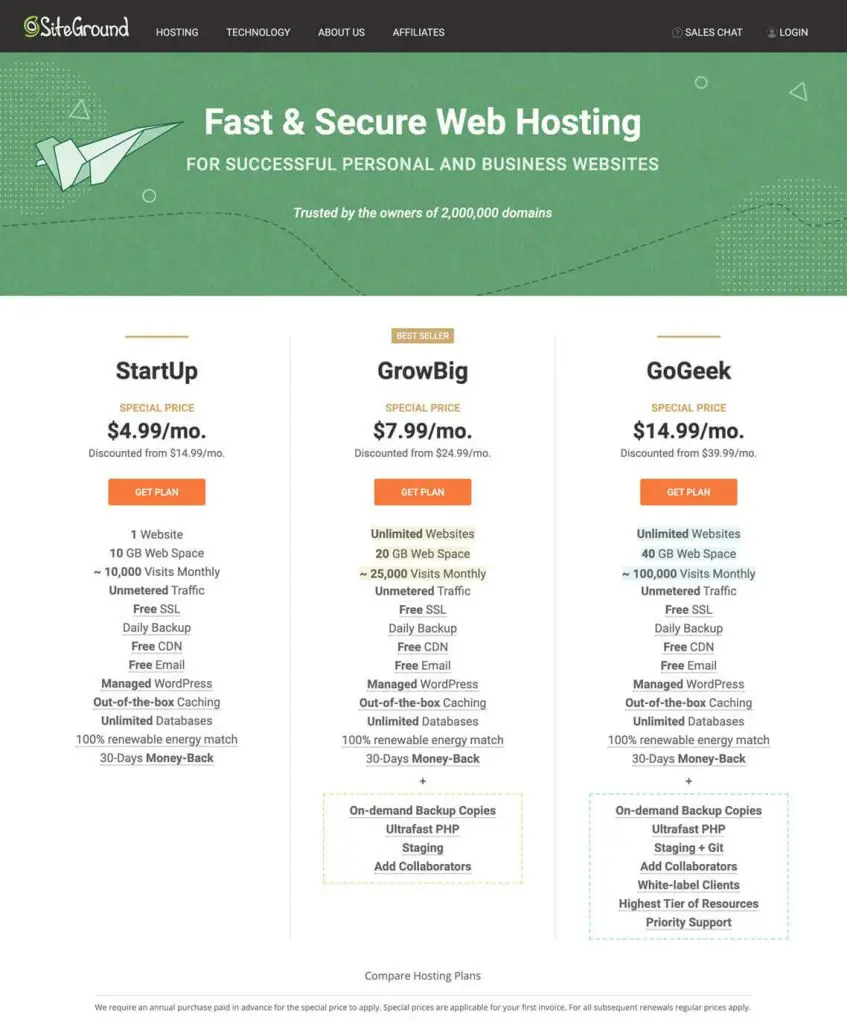
Step 1: Choose a Hosting Plan
Siteground has three different plans. If you’re just starting out, I would choose the StartUp plan. You can always upgrade later.
-
The StartUp plan is perfect for people with one website that are starting now.
-
The GrowBig plan is a great value for money offer, including the option for multiple websites and the Ultrafast PHP that greatly improves website speed.
-
The GoGeek plan is perfect for people with e-commerce and larger sites, or more geeky development needs like more server resources and GIT integration.
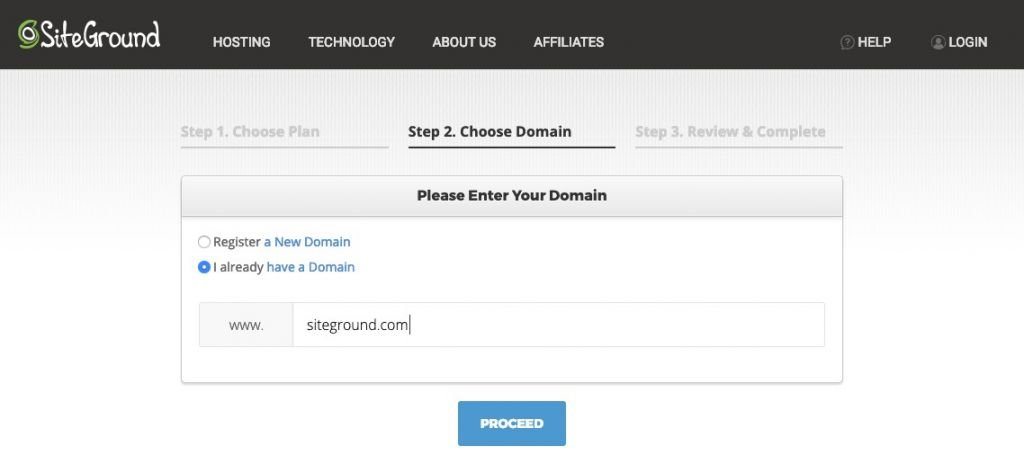
Step 2: Choose a Domain Name
You can buy a domain name at Siteground too for a good price. You can also buy your domain at another provider (like Godaddy) and point the nameservers to Siteground for your hosting.
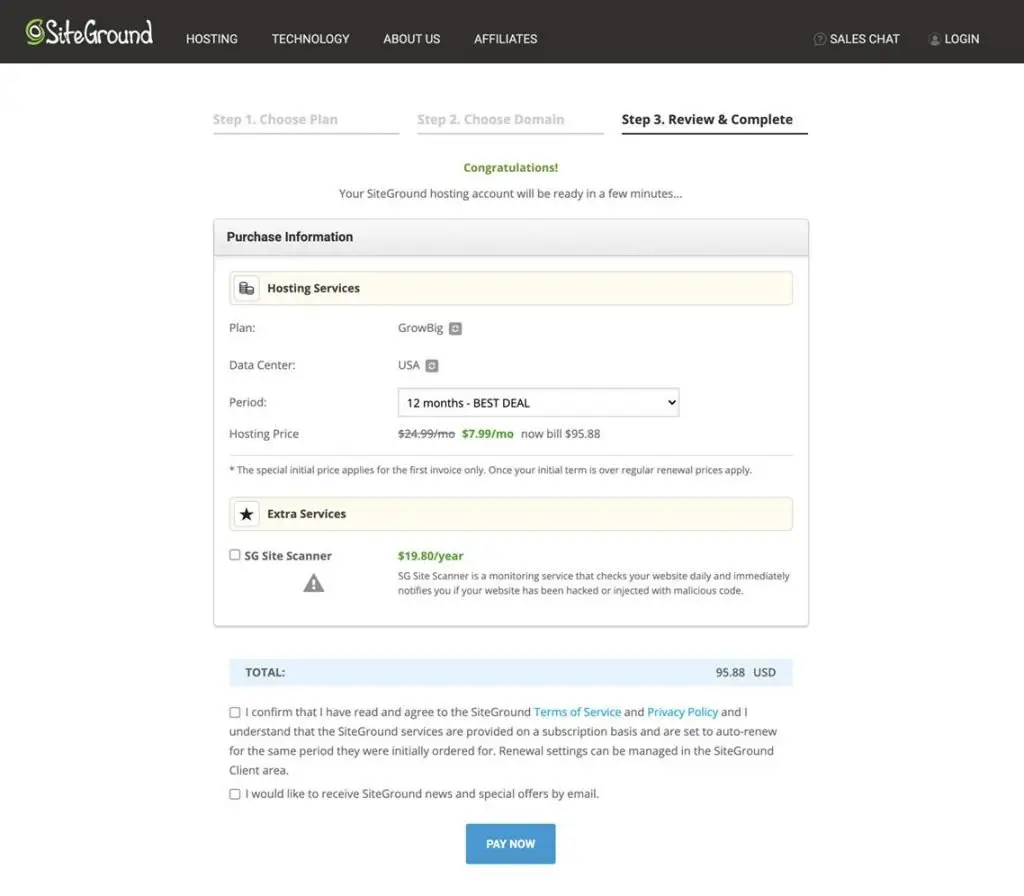
Step 3: Review and Complete the Order
When you check out, you can choose how long the hosting plan should last. There is always a discount upfront so the longer you sign up for, the bigger the discount. If you’re a new blogger, I would sign up for 12 months because you never know how you might feel after a few months. If you really enjoy it and want to continue, then you should extend the hosting. However, know that it’s only when you first join that you’ll be able to get the best offers.
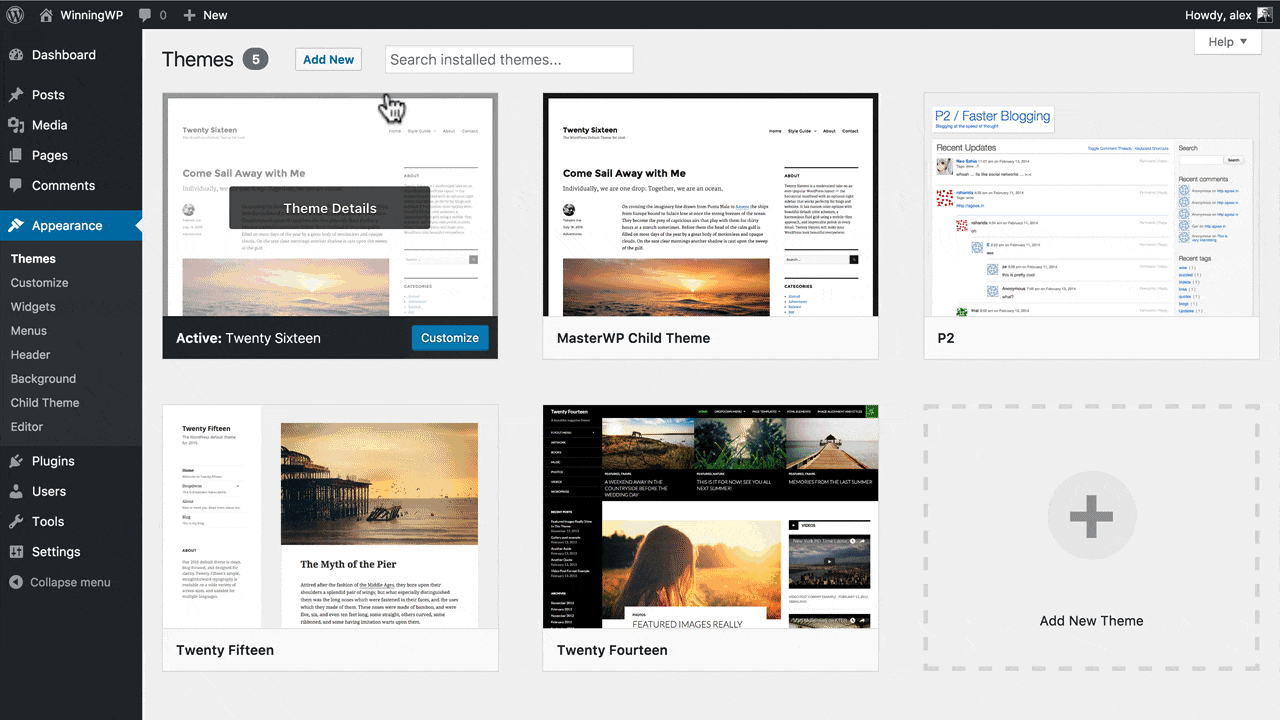
Choose a beautiful theme
Okay so you’ve finally installed WordPress successfully. Congrats!
The default theme that comes with WordPress is mediocre at best. It is very plain, simple, and functional. However, you will want something a little bit more inspiring and visually appealing. This is a travel blog after all and you want a theme that stands out and catches people’s attention.
Gone are the days where you have to design websites on your own. I remember these days 20 years ago tinkering around in Microsoft Frontpage and actually having to understand HTML. Those days are no more because you can purchase pre-made themes that are ready to use with a few clicks of the button.
I like to look at Themeforest which has the biggest repository of WordPress themes on the market. You can spend hours and days perusing through this marketplace. They have themes for just about any website or business you can think of. I would stick to something simple and geared towards travel blogging in particular.
- Make sure you like the theme! You can view demo copies of the theme to see if it’s something that excites you. You will be looking at it day in and day out so it needs to be something you’re passionate about.
- Check the reviews: The reviews are important because other people’s opinions count. If the rating is below 4*, that means there is something seriously wrong. This could be anything from site speed being slow, the theme being very difficult to customize, or the customer support is bad. You are paying for this theme so make sure it counts.
- Spend the money and pay for a theme: In my early days of blogging, I used the free themes in WordPress’ themes repository. There’s nothing wrong with this but in the end, you want to start off right. This means paying for a premium theme that you really like the look of.
For example, the Backpacker Traveler theme on Themeforest looks very tempting. It’s just what I’m looking for. However, the reviews of this theme is a paltry 3.9 out of 5. This is a huge red flag because you’ll want your ratings to be near 5 stars which means that it has been thoroughly vetted by others.
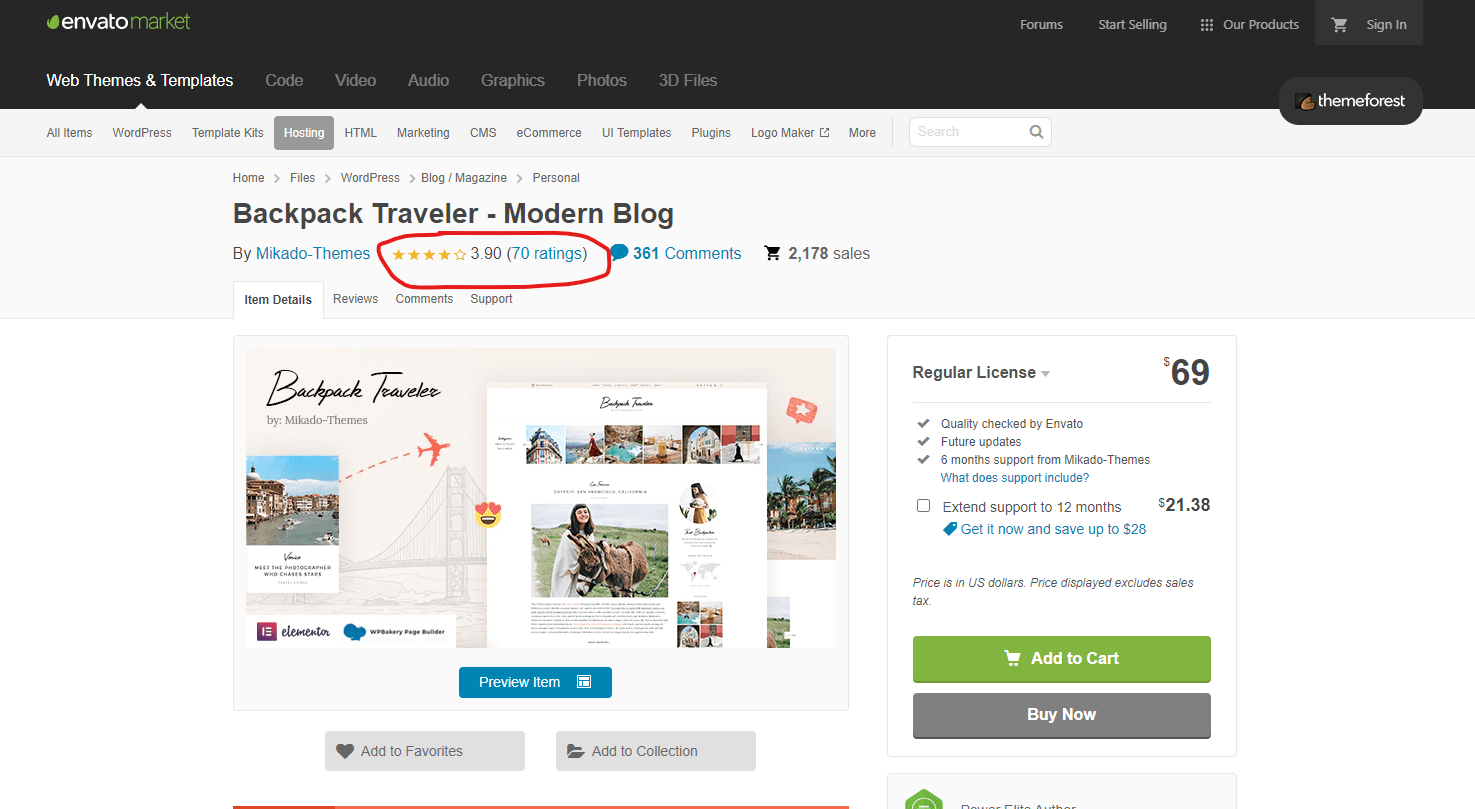
If you read through the reviews, they are pretty terrible. Most of the complaints are that it is incredibly hard to customize and it looks nothing like what the pictures and demo previews show.
Choose a fast theme
Fast themes are an absolute must in today’s day and age. If you want to rank and perform well with Google, you need to pass Google’s Core Web Vitals (CWV). It is just Google’s way of measuring your site speed on a variety of different factors. It gets very complicated and actually passing these requirements is a huge endeavor in and of itself with a whole industry on Fiverr popping up specifically for this.
You must choose a fast theme that is light on JQuery and back end code. It’s temping sometimes to find a theme that is very eye-catching but if it’s pumped full of mediocre code, it will slow your site down and your site speed will suffer. Here are some of the fastest themes available on the market:
- Generate Press
- Astra
- OceanWP
- Blocksy
- Kadence
- Genesis
How to install your WordPress theme
To install your new theme, simply go to Appearance > Themes in the WordPress dashboard and upload your theme file there!
Customizing your theme in WordPress is very easy and doesn’t require you to edit any code – just go to Appearance > Customize and get to work. Of course, while coding is unnecessary, having a basic knowledge of where things are located in WordPress will help tremendously. This is just the learning curve involved with WordPress and will take some time. The more hands on you get, the easier it will be!
Install plugins to make your blog shine
The next step is to install plugins to your blog. Plugins are little addons created by other people that will add different functionality to your site. This includes anything from a small newsletter subscription form to a huge online marketplace where you can sell goods.
There are a few plugins that every travel blogger should install just to get started on the right foot.
- Yoast SEO: Seo, or Search Engine Optimization is important for getting your website onto Google. Yoast will guide you step by step and how to make sure you structure your blog as best as possible to rank on Google
- Social Warfare: Add social network buttons to your website so readers can easily share your posts. I use Social Warfare
- Akismet: This plugin filters out spam comments from your blog. This happens a lot and the plugin is constantly filtering out thousands of comments for me
- Google Analytics: Without a doubt, you’ll want to install Google Analytics because this will show you all the stats you could possible want to know about your traffic
- Imsanity: Because travel blogs are image heavy, you’ll want a plugin to ensure your image sizes aren’t crazy.
- Siteground Optimizer: If you’re on Siteground hosting (see above), they have an incredible in-house plugin to improve your site speed. This employs various caching, compression, and minifying techniques to help speed up your blog.
Don’t install too many plugins
For beginner bloggers, it’s very easy to get carried away with installing plugins for everything. Once you start perusing the thousands of plugins available on WordPress, you’ll be tempted to install everything. The problem with this is every plugin adds additional code to your website. The more you add, the slower your blog will become.
When you become a serious blogger, you’ll want your site to load fast and efficiently above all else. This is because Google takes into account how fast your site loads. If you have the best content in the world but it takes a minute to load, no one will want to wait that long to access your blog. Google knows this and ranks sites accordingly.
Take good pictures for travel blogging
For any successful travel blogger, you’ll want to take the best photos possible. You are talking about traveling after all and people want to see amazing and inspiring photos that bring about FOMO and jealousy. They might not think that out loud, but trust me when I saw people gravitate towards highly edited and optimally timed photos.
A picture is worth a thousand words as they say and nowhere does this apply more than in travel blogging. You can describe how beautiful a beach is all day but in the end, it can’t describe it as well as a nice picture.
For example, take a look at this photo I took of one of the sandbanks I visited in the Maldives. If you like beaches and this picture doesn’t give you massive FOMO, then you don’t like beaches.

Make sure to obtain a good camera. Your iPhone is good for sharing stuff to social media but in the end, you’ll want a higher resolution camera that can shoot raw.
I like to use the mirrorless DSLR cameras because of how lightweight and versatile they are. I like to pack as light as possible and a huge camera with its own camera bag just isn’t my thing.

After you get your camera, start shooting pictures in RAW. This picture format will allow you to tweak the colors, brightness, contrast and literally everything you think of via Adobe Lightroom. I shoot everything in raw, edit them in Lightroom through presets I’ve created and out comes much nicer photos!

Discover your voice and style of blogging
One of the most paramount things to blogging is discovering what kind of voice you want to give. For me, travel blogging is broken down into two styles:
- Writing to simply document your travels
- Writing to provide information to your readers
I think most people start in the first category. You get an idea to start a travel blog to record their travel experiences or maybe to let mom and dad see what is happening in your life. Maybe you share the occasional experience to Facebook or Instagram.
This is pretty much how I blogged when I started out. I would talk about every little thing I experienced on my trip. Maybe the guy sitting next to me smelt funny, or my hostel mates were from xyz country. Most of the details are completely irrelevant and while it might be entertaining to read for some, it’s still not very helpful.
If you want to start a travel blog that gets a lot of hits and ranks highly on Google, you’ll want to travel blog to provide information to your readers. This means explaining concisely and descriptively what to do, where to go, what to eat, how to get from A to B, etc.
You’ll want to provide information to your readers that’s helpful and useful. Something that a complete random stranger can read and obtain information. You are not in the business of making every reader your BFF. Rather you want to make your blog something easy to discover for other readers so you can get as many readers as possible.
How to monetize a blog
Once you’ve written a few posts and are finally getting some traffic to your blog, you might think about monetizing your website.
There are countless ways to monetize your website but the most common methods are through the following:
- Advertisements
- Sponsored Content (where people pay you money to post on your blog)
- Affiliate Marketing
I would start off with running advertisements which is the easiest and most passive method to making money. You’ll need quite a bit of traffic to make this worthwhile so I would only start this when you are having at least 1000 pageviews a month.
I’ve written in great detail about how I monetize my blog and how much money I made travel blogging.
While I make money blogging, this is not my primary source of income. That would be my investment portfolio which I manage and trade as part of my pursuit of financial independence.
Is it too late to start travel blogging?
I think ten years ago, if you were a travel blogger you were at the forefront of a new industry. Nowadays, as web design and travel itself have become much easier to plan, everyone has a travel blog. There are many travel blogs out there all competing for the same pool of readers.
However, travel blogging is not a get rich quick scheme. Like working in scuba diving, you do this first because it’s a passion and hobby. If you are lucky and work hard, then perhaps you might make it big and make it into something more1